Elasticsearch! At SnApp we use Elasticsearch for our real estate searches. If you’re using Elasticsearch, chances are high that you’ll run into a situation where you’ll want to make changes to existing fields.
If you nail the mapping on the first go, props 🙌, that’s hard to do. Once you put your cluster out into the wild to handle live searches, you’ll get a better idea of how your data will need to be mapped. Or maybe requirements change. Whatever the reason, you can easily find yourself in a situation where you’ll want to adjust analyzers, change datatypes, etc. This is where reindexing comes in. Woohoo!!
When I began planning how to reindex our Elasticsearch cluster with no downtime, I started by searching the interwebs for how others handled this process. I found several articles. However, most contained ambiguous guidelines and general ideas of how to reindex with no downtime. I didn’t find many that touched on the details: How do you handle updates to documents during reindexing? How do you handle deletes? If I’m writing to two indexes during reindexing how do I make sure that outdated data doesn’t get into the new index?
I’m going to start by explaining the basic architecture. Then I’ll explain the process I used. Your setup may differ from what is used here, but you should be able to tweak the process for your needs.
It’s a good idea to do a trial run to get all your ducks in a row before doing a live run. You’re bound to run into something unexpected during the process.
Architecture
Below is a simplified diagram of our infrastructure centered around the interaction with Elasticsearch.
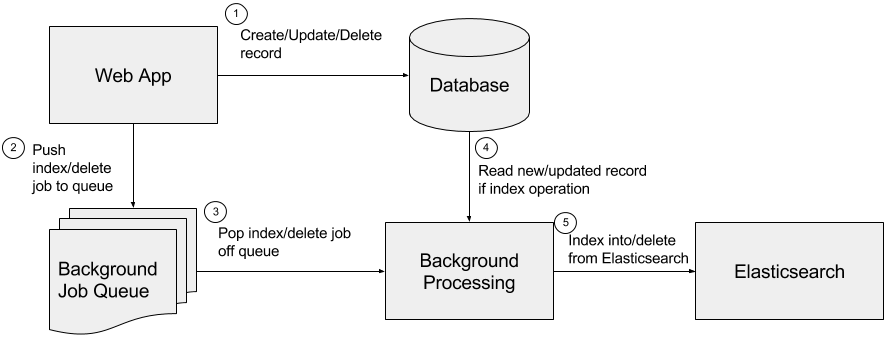
- Records are created, updated, and deleted from our main data store (Postgres in this case).
- After the transaction is committed to the main data store, a background job to perform the corresponding operation in Elasticsearch is enqueued (into Redis in this case).
- A job to index/delete a record in Elasticsearch is popped off the queue to be processed in the background (by Sidekiq in this case).
- If this is an index operation, the background job will query the main data store for the new or updated data.
- The index or delete operation is performed on Elasticsearch
Steps
Step 1: Prepare New Index
The first step is to create the new index with the new mapping. You can create the new index on your existing Elasticsearch cluster or on a brand new one. If you’re in a situation where you can afford to throw away your current cluster when you’re done, or you can afford to separate your newly reindexed data into a new cluster, this may be your best option.
Reindexing into a new instance of Elasticsearch reduces the memory and CPU load on your live instance during the reindex process, reducing the risk of a crash. In order to provide the super duper fast 💨 search, Elasticsearch runs analyzers and processes documents on write, making writes more expensive than reads. Therefore, reading all the data from your live instance while indexing it into a new instance is a good idea! Priority #1: Zero Downtime.
For this post, I’m going to refer to the location of the
old index host as OLD_ELASTICSEARCH_URL and the location of the new index host
as NEW_ELASTICSEARCH_URL, even though
they may be the same in your particular case.
How exactly do I create my new index?
If you’re using an Elasticsearch client, chances are they have an API for creating new indexes. If you’re not,
you can use the create index API with curl.
We are using elasticsearch-rails, so I created a module to hold the new index mapping as well as act as version history for the index. You’ll probably want to keep the same document type name that you’re using in your live index.
module MyIndexV2
  extend ActiveModel::Naming
  extend Elasticsearch::Model::Naming::ClassMethods
  extend Elasticsearch::Model::Indexing::ClassMethods

  index_name :my_index_v2
  document_type :my_index

  mappings dynamic: 'false' do
    indexes :id, type: 'integer'
    indexes :name
    indexes :address
    indexes :zipcode, index: 'not_analyzed'
  end
end
To create the new index using the new mapping:
client = Elasticsearch::Client.new(host: ENV['NEW_ELASTICSEARCH_URL'])
client.indices.create(
  index: MyIndexV2.index_name,
  body: { mappings: MyIndexV2.mappings.to_hash }
)
To verify the new mapping navigate or make a request to:
http://#{your_es_host}/_mappingsTo delete the new mapping if there is a mistake:
curl -XDELETE http://#{your_es_host}/#{index_name}/Step 2: Keep Indexes Up To Date
We are going to be pulling the documents from the old index using a scrolled search and importing them into the new index using the bulk API. The scrolled search essentially takes a snapshot of the index at the time of the initial request. So, subsequent indexing or deleting of documents will not be reflected in our scrolled search. If it’s not immediately clear what I mean, consider these problem scenarios:
Scenario 1
Given: Scrolled search is initiated at time x
When: Record A is created after time x
Then: Record A will not be in the scrolled search results
Scenario 2
Given: Record A is in the old index and scrolled search is initiated at time x
When: Record A is deleted after time x
Then: Record A will still be in the scrolled search results
Therefore, we need to make sure that our new index is in sync with our old by the time we’re done. There are a few ways of handling this and the best depends on your situation and constraints. We also need to make sure that our bulk API requests are not overwriting new data in our new index with old data from our scrolled search results. This will be discussed more in Step 3.
Writes
How do we handle creating and updating documents during our reindex process?
Options
- Write to both old and new indexes during reindexing
- Write to only new index during reindexing
I went with Option 1 because I wanted to keep live searches up to date with new information during reindexing.
Option 1 also provides a safety net if you mess up your new index - you can rollback to the old.
If the potential of having slightly out of date data in your live searches during reindexing is small, then
maybe Option 2 is a good option.
To implement Option 1 we can adjust our background worker to write to both indexes. This will
look something like:
class IndexWorker
  include Sidekiq::Worker

  def perform(record_id)
    # NOTE: It's only necessary to have two clients if your
    # indexes are on separate hosts
    client_old = Elasticsearch::Client.new(host: ENV['OLD_ELASTICSEARCH_URL'])
    client_new = Elasticsearch::Client.new(host: ENV['NEW_ELASTICSEARCH_URL'])

    record = MyRecord.find(record_id)
    client_old.index(
      index: 'my_index_v1',
      type: 'my_index',
      id: record.id,
      body: record.as_indexed_json
    )

    client_new.index(
      index: 'my_index_v2',
      type: 'my_index',
      id: record.id,
      body: record.as_indexed_json_v2
    )
  end
end
Note that we are sending different JSON bodies to each index: #as_indexed_json to our old index and #as_indexed_json_v2
to our new index. These are methods defined on the model to customize the data sent to Elasticsearch.
In my case, I needed to serialize the data going to my new index differently than that going to my old. For more info
see Model Serialization.
Deletes
Deletes are a bit trickier. We can’t handle them like we did writes because there is a race condition. Consider the following problem scenario:
Given:
- Record A exists in the old index
- We have started the reindex process, capturing A in the scrolled search snapshot
- Record A is not yet in the new index
When: A DELETE operation on Record A occurs
Then:
- Record A is deleted from old index, but not from our new index because it doesn’t exist yet
- Record A is later indexed into the new index when it is returned from our scrolled search snapshot
So there is a race condition between deleting and indexing the record. If we reindex Record A before the DELETE operation comes in, we are fine. If we try to DELETE a non-existent Record A in our new index and then insert the same record from our scrolled search, we have a record in our new index that should not exist.😫
Options
- Eliminate the possibility of deleting records during reindexing
- Push delete operations to a queue during reindexing to be processed when done
In my case, Option 1 was the easiest. I knew exactly where deletes were coming from in the codebase and that they were happening
infrequently. Therefore, I turned deletes off during the reindex process. Just incase I may have missed something,
I made sure to log if there was a delete operation and the ID of the record to be deleted.
It is likely that Option 1 is not the best for you. In this case, you can push a delete job to a background
queue that isn’t processing jobs during reindexing. Then process these when done.
class DeleteFromNewIndexWorker
  include Sidekiq::Worker
  sidekiq_options queue: 'elasticsearch_deletes'

  def perform(record_id)
    client_new = Elasticsearch::Client.new(host: ENV['NEW_ELASTICSEARCH_URL'])
    client_new.delete(index: 'my_index_v2', type: 'my_index', id: record_id)
  end
end
Putting it together
Your final result may look something like this:
class IndexWorker
  include Sidekiq::Worker

  def perform(operation, record_id)
    # NOTE: It's only necessary to have two clients if your
    # indexes are on separate hosts
    client_old = Elasticsearch::Client.new(host: ENV['OLD_ELASTICSEARCH_URL'])
    client_new = Elasticsearch::Client.new(host: ENV['NEW_ELASTICSEARCH_URL'])

    case operation.to_s
    when /index/
      record = MyRecord.find(record_id)
      client_old.index(
        index: 'my_index_v1',
        type: 'my_index',
        id: record.id,
        body: record.as_indexed_json
      )

      client_new.index(
        index: 'my_index_v2',
        type: 'my_index',
        id: record.id,
        body: record.as_indexed_json_v2
      )
    when /delete/
      client_old.delete(index: 'my_index_v1', type: 'my_index', id: record_id)
      DeleteFromNewIndexWorker.perform_async(record_id)
    else raise ArgumentError, "Unknown operation '#{operation}'"
  end
end
Deploy
Once you are ready, it’s a good time to deploy your changes! Once you do, you should be performing index operations on your new index.
Step 3: Perform Reindexing
As I mentioned before, you’ll want to use a scrolled search for reading the data and bulk API for inserting.
In addition, since we are now writing new and updated documents to our new index in the background,
we want to make sure we do NOT update existing documents in our new index with our bulk API requests.
This means that the operation we want for our bulk API requests is create, not index. From the
documentation:
“create will fail if a document with the same index and type exists already, whereas index will add or replace a document as necessary”.
The main point here is you do not want old data from the scrolled search snapshot to overwrite new data in the new index.
Luckily there is a great es-reindex script to help with this process. Big thanks to geronime for making this publicly available. By default, this script will only create non-existing documents, which is exactly what we want.
There is a place in the script for you to implement document modifications before inserting them into the new index. This is where you want to perform any casting, string concatenation, etc. for your new index.
I ran into an issue using this script on AWS Elasticsearch service. AWS would throw an error when using the scroll ID as a URL param. It turns out that the scroll ID length grows with the number of shards in your cluster and the ID was too large to be a URL param.
Fortunately the Elasticsearch API allows you to send the scroll ID in the request body. However, rest-client, which the es-reindex script uses to make HTTP requests, does not allow you to easily add data to the body of a GET request from what I could gather. So I used Net HTTP (which should probably be used for all requests in the script) for these requests. You can find my changes on github.
I chose to run this script on an AWS EC2 instance for a faster data transfer. This way the data flow is internal to the AWS network. However, you can run the script from your local machine.
./es-reindex "#{old_index_host}/#{old_index_name}" "#{new_index_host}/#{new_index_name}"The script will give you progress and time estimates during the process. In addition, when it is done it will verify that the old index document count equals the new index document count.
Step 4: Switch Over
Once you’re finished reindexing, it’s time to switch your search over to the new index. You’ll want to turn deletes back on or process the enqueued delete jobs for the new index. You may notice that searching the new index is a bit slow at first. This is because Elasticsearch and the JVM need time to warm up.
Perform any code changes you need so your application starts searching the new index. You can continue writing to the old index incase you run into problems and need to rollback. If you feel this is unnecessary, you can stop writing to it.
For elasticsearch-rails you’ll want to change your model client if you used a different host
for your new index
MyModel.__elasticsearch__.client = Elasticsearch::Client.new(
  host: ENV['NEW_ELASTICSEARCH_URL']
)
and change the index name and mappings in your model
class MyModel
  index_name :my_index_v2
  document_type :my_index

  mappings dynamic: 'false' do
    indexes :id, type: 'integer'
    indexes :name
    indexes :address
    indexes :zipcode, index: 'not_analyzed'
  end
end
Deploy
When you’re ready, deploy your changes!
Step 5: Clean Up
At this point you should be completely transitioned to the new index. If everything is going well, perform any necessary cleanup such as:
- Delete the old index host if it’s different from the new
- Remove serialization code related to your old index